DAW IT User manual

englidh language

You are on DAW IT User Manual > Contents > 3D Pads

3D Pads

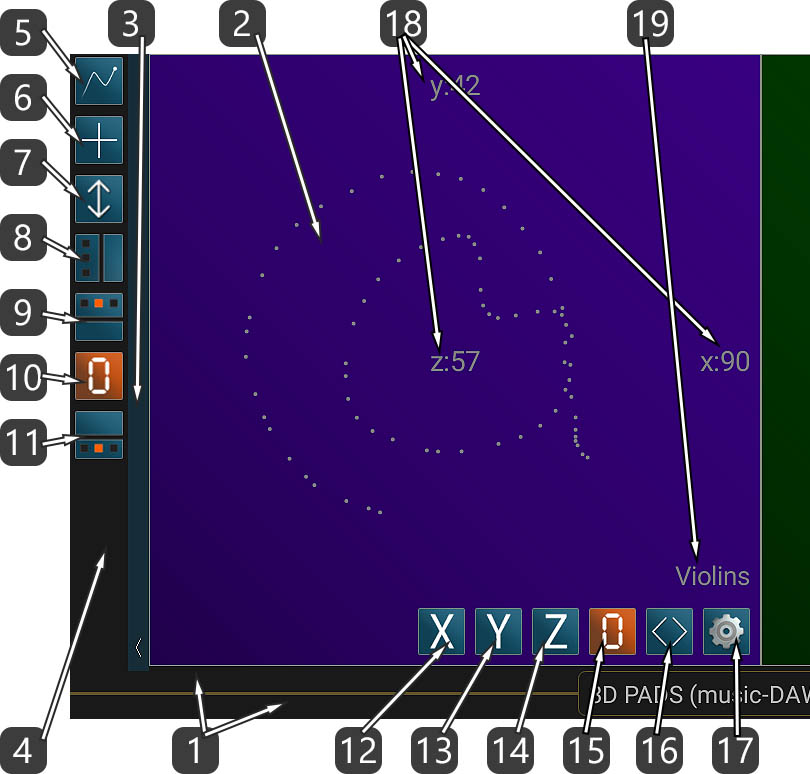
The 3D Pads are the well known XY Pads which simulate a joystick’s movements on 2 axes, X and Y.
However, there is a slight difference which can expand your workflow and possibilities:
The addition of a 3rd MIDI controller which can be controlled by a 2nd finger. This is the Z axis.
Now you can control 3 MIDI controllers at once by assigning them on the X, Y and Z axes. Of course, the Z axis is imaginary.
Just imagine controlling Dynamics, Expression and Vibrato Depth of a Cello section, all in real time.
Any of these 3 axes can be muted at any moment.

For example, you may need to “Learn” the X axis controller into a VST instrument.
All you have to do is to enable the LEARN function on the VST Instrument, then mute Y axis and then slide your finger on the 3D Pad.
Boom !!! The X axis controller has been learned !

The usual workflow is:

  1. Assign 2 or 3 MIDI Controllers (range: 0-127) to the target instrument or effect parameters you want to control.
  2. Assign the same MIDI Controllers to 2 or 3 axes of a 3D Pad on DAW IT.
  3. Mute the axes you don’t use.

Or you can do it backwards:

  1. Assign 2 or 3 MIDI Controllers (range: 0-127) to 2 or 3 axes of a 3D Pad on DAW IT.
  2. Use the “LEARN” function, if provided, for the target parameters you want to control, one by one and then slide your finger onto one axis while muting the other two axes on DAW IT.

As this is a MIDI procedure, you can record and edit the 3D Pad movements into your DAW software.

DAW IT lets you create and use up to 20 3D Pads per Preset.

Description

3D pads numbered description
  1. This horizontal bar is the TITLE BAR but it is also the SCROLL BAR for all 3D pads. The title contains the currently loaded preset.
    Slide your finger on it to move around.
    – By sliding left or right inside the title, you can move between the main functions of DAW IT rotationally.
    – If you tap 2 fingers on it you enter the SCROLL mode.
  2. This is the main touch area of the 3D Pad. It sends values in range 0-127 through MIDI Port.
  3. Tap on this vertical bar with the arrow to reveal or hide the TOOLBAR.
    Also, you can slide down on it to enter full screen mode. Slide up to return to normal mode.
    Slide left or right to move the whole toolbar to the left or right side of your screen.
  4. This area is the TOOLBAR.
  5. Tap on this button to edit specific properties for ALL 3D PADS. This is called the EDIT ALL 3D PADS mode.
  6. Tap on this button to ADD a 3D PAD.
  7. This button resizes the 3D pad touch area horizontally or vertically in order to match any device screen size.
  8. This button switches the display between 1 row or 2 rows of 3D pads.
  9. Tap on this button to show/hide the assigned controllers and their current values of X, Y and Z axes, for all 3D pads.
    You can select between 4 states, rotationally:
    a- Hide all.
    b- Controller values (0-127).
    c- Controller numbers (0-127).
    d- Controller MIDI channels (1-16).
  10. SET ALL 3D PADS to 0.
    This button sets all 3D pads values to 0 and sends these values through MIDI Port.
    If a value was already at 0, it won’t be sent to MIDI port.
  11. Tap on this button to show/hide the lower area for all 3D pads.
    You can select between 4 states, rotationally:
    a- Hide all.
    b- Show all (mute buttons for X, Y, Z axes, set this 3D pad to 0, move 3D pad, edit 3D pad and title).
    c- Hide title.
    d- Show title and hide buttons.
  12. Mute X axis.
  13. Mute Y axis.
  14. Mute Z axis.
  15. SET 3D PAD to 0.
    This button sets this particular 3D pad values to 0 and sends these values through MIDI Port.
  16. Tap on this symbol to enter the MOVE 3D Pad mode.
    Tap again to exit to normal mode.
  17. Tap on this button to enter the EDIT 3D PAD screen.
  18. These labels are read only and represent every axis assigned controllers and their current values, according to #9 above.
  19. This is the TEXT LABEL. It can be changed by tapping the Edit 3D Pad button on #17.

Please note !!!

The TITLE BAR is also used as the SCROLL BAR for all 3D pads.
- Slide your finger on it to move around.
- If you tap 2 fingers on it you enter the SCROLL mode.

Useful Tip !

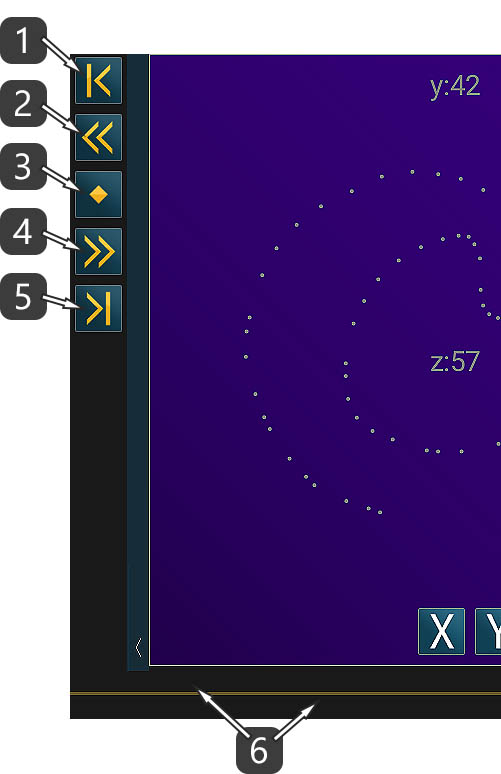
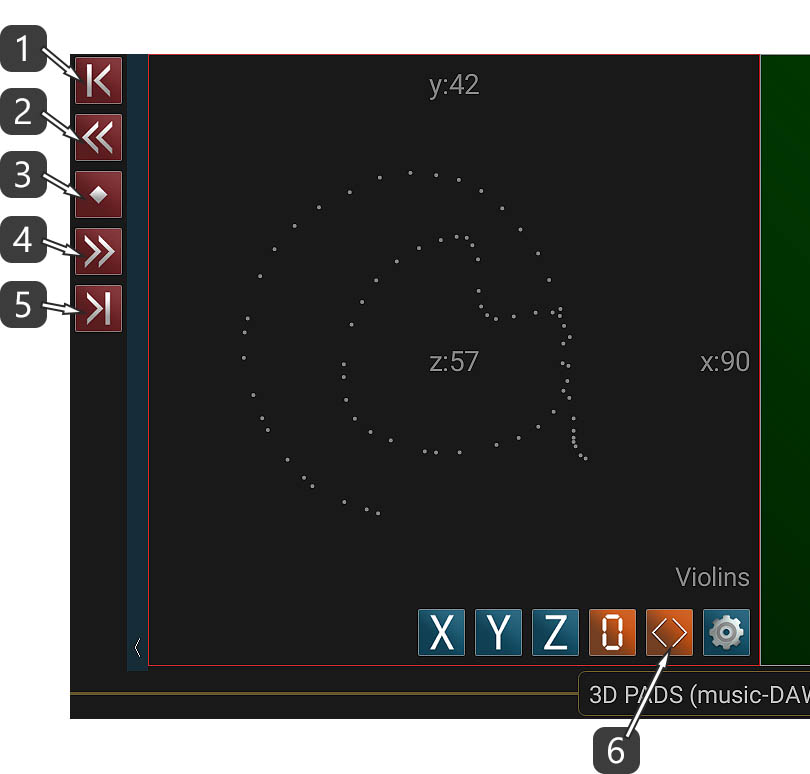
On #9 and #11 above, if you tap and hold these buttons, you select state -a-,
which hides all the information values or the lower area, for all 3D Pads.

Add 3D Pads

This function lets you add 3D Pads.
All properties fields are the same as the EDIT 3D PAD screen.
The only difference is the Quantity and Position properties as described below.

add fader and label numbered description
  1. Set the quantity of the new elements.
  2. Set the position of the new element amongst the others.
  3. Press APPLY to execute the ADD command.
  4. Each time you edit an existing element in DAW IT, all its properties are copied into the Clipboard.
    Press PASTE to paste them here and then make any changes you want. 
    Press APPLY when you’re ready.

Useful Tip !

If you want to copy and paste all properties from one 3D pad to another,
just edit the 1st pad, then go back and then edit the 2nd pad and paste settings.
After this, make any changes you want.

Scroll mode

You entered this mode by following the instruction #1 of the Description section.

scroll 3d pads with numbers2
  1. Scroll to start.
  2. Scroll 1 page left.
  3. Scroll to center.
  4. Scroll 1 page right.
  5. Scroll to end.
  6. Tap 2 fingers on the Scroll bar to Exit to normal mode.

Move 3D Pad mode

You entered this mode by following the instructions #16 of the Description section.

move 3d pads numbered decription
  1. Move selected item to start.
  2. Move selected item 1 page left.
  3. Move selected item to center.
  4. Move selected item 1 page right.
  5. Move selected item to end.
  6. Tap on this button to Exit to normal mode.

Example

dawvelopment logo