DAW IT User manual

englidh language

You are on DAW IT User Manual > Contents > Faders

Faders

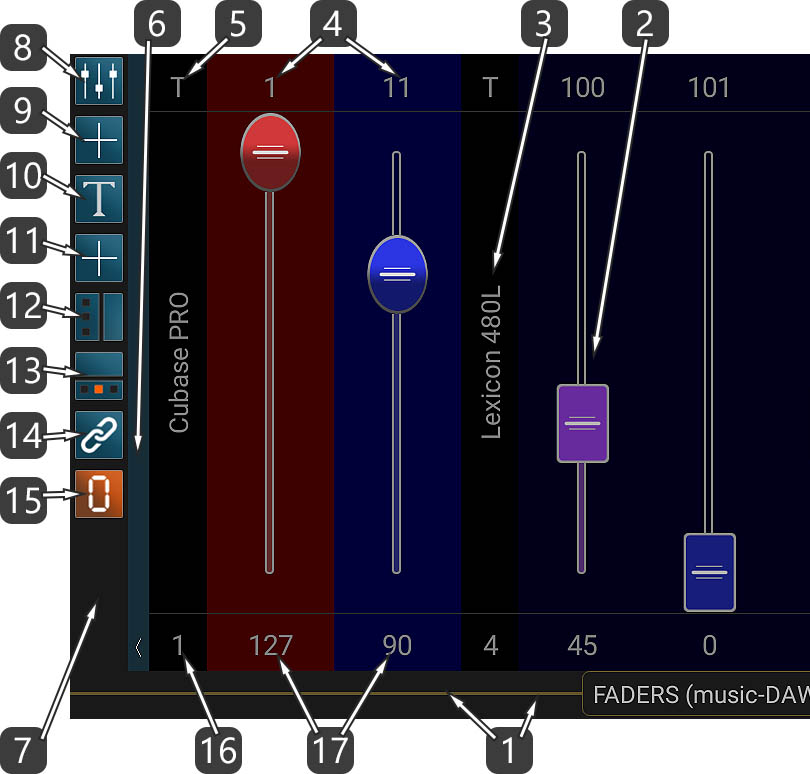
Faders are sliders which control various parameters of synthesizers or effects via MIDI. These parameters usually affect the behavior of an instrument or effect, for example the “Vibrato depth” of a violin or a “filter’s Resonance” of a synth or the “Predelay” of a reverb.

The usual method is:

  1. Assign a MIDI Controller (range: 0-127) to the target instrument or effect parameter you want to control.
  2. Assign the same MIDI Controller to a fader on DAW IT.

Or you can do it backwards:

  1. Assign a MIDI Controller (range: 0-127) to a fader on DAW IT.
  2. Use the “LEARN” function, if provided, for the target parameter you want to control and move the fader on DAW IT.

As this is a MIDI procedure, you can record and edit the fader movements into your DAW software.

DAW IT lets you create and use up to 40 faders per Preset.
Also you can add Text Labels between faders to set names to groups of faders.

Description

faders numbered description
  1. This horizontal bar is the TITLE BAR but it is also the SCROLL BAR of all faders. The title contains the currently loaded preset.
    Slide your finger on it to move around.
    – By sliding left or right inside the title, you can move between the main functions of DAW IT rotationally.
    – If you tap 2 fingers on it you enter the SCROLL mode.
  2. This is the FADER. It sends values in range 0-127 through MIDI Port.
  3. This is the TEXT LABEL.
  4. The number over each fader indicates the Controller number or the MIDI Channel you selected, according to #13 below.
    Tap on it to enter the EDIT FADER screen.
  5. Tap on letter “T” to enter the EDIT TEXT LABEL screen.
  6. Tap on this vertical bar with the arrow to reveal or hide the TOOLBAR.
    Also, you can slide down on it to enter full screen mode. Slide up to return to normal mode.
    Slide left or right to move the whole toolbar to the left or right side of your screen.
  7. This area is the TOOLBAR.
  8. Tap on this button to edit specific properties for ALL FADERS. This is called the EDIT ALL FADERS mode.
  9. Tap on this button to ADD a FADER.
  10. Tap on this button to edit specific properties for ALL TEXT LABELS. This is called the EDIT ALL LABELS mode.
  11. Tap on this button to ADD a TEXT LABEL.
  12. This button switches the display between 1, 2, 3 and 4 rows of faders.
  13. Tap on this button to show/hide all elements properties like Value, Position and MIDI channel.
    You can select between 3 states, rotationally:
    a- Hide all.
    b- Controller numbers (0-127) for the faders and (T) for the labels in the upper row.
         Controller value (0-127) for the faders and Position for the labels in the lower row.
    c- MIDI channels (1-16) for the faders and (T) for the labels in the upper row.
          Position for all elements in the lower row.
  14. Tap on this button to enter the LINK MODE in order to link a fader to its next one.
    Select these 2 faders by tapping on their position or value number. (see #13)
    The 1st is the Primary and the 2nd follows (Secondary).
  15.  SET ALL FADERS to 0.
    This button sets all faders values to 0 and sends these values through MIDI Port.
    If a value was already at 0, it won’t be sent to MIDI port.
  16. Tap on these symbols to enter the MOVE Fader/Label mode.
    Tap again to exit to normal mode. 
  17. These numbers represent the fader position or its current value according with the state you selected on #13.
    Tap on these numbers to enter the MOVE Fader/Label mode.

Please note !!!

The TITLE BAR is also used as the SCROLL BAR for all faders.
- Slide your finger on it to move around.
- If you tap 2 fingers on it you enter the SCROLL mode.

Useful Tip !

On #13 above, if you tap and hold this button, you select state -a-,
which hides both the upper and lower rows for all faders and text labels.

Add Faders / Text Labels

This function lets you add Faders or Text Labels.
All properties fields are the same as the EDIT FADER and EDIT TEXT LABEL screens respectively.
The only difference is the Quantity and Position properties as described below.

add fader and label numbered description
  1. Set the quantity of the new elements.
  2. Set the position of the new element amongst the others.
  3. Press APPLY to execute the ADD command.
  4. Each time you edit an existing element in DAW IT, all its properties are copied into the Clipboard.
    Press PASTE to paste them here and then make any changes you want. 
    Press APPLY when you’re ready.

Useful Tip !

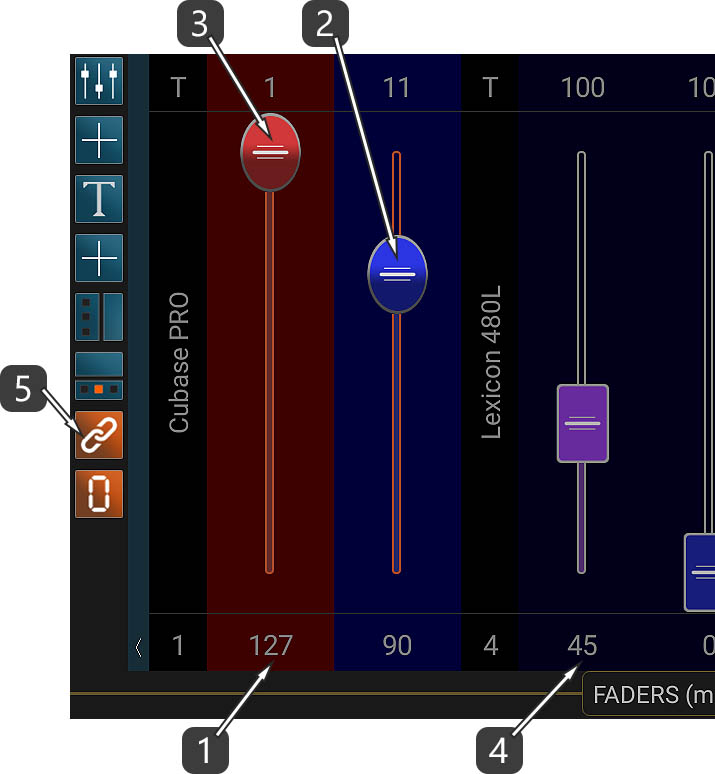
If you want to copy and paste all properties from one fader or text label to another,
just edit the 1st element, then go back and then edit the 2nd element and paste settings.
After this, make any changes you want.

Scroll mode

You entered this mode by following the instruction #1 of the Description section.

scroll faders numbered
  1. Scroll to start.
  2. Scroll 1 page left.
  3. Scroll to center.
  4. Scroll 1 page right.
  5. Scroll to end.
  6. Tap 2 fingers on the Scroll bar to Exit to normal mode.

Move Fader/Label mode

You entered this mode by following the instructions #16 or #17 of the Description section.
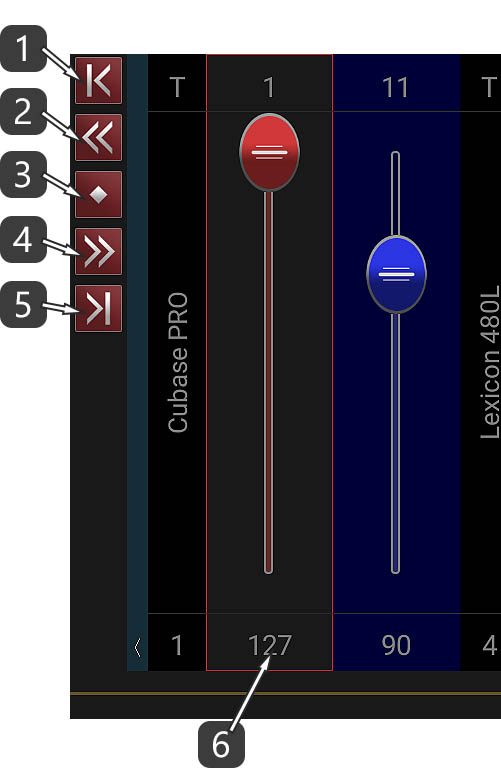
In the screenshot below, notice the red rectangle which indicates the element to be moved.

move faders numbered
  1. Move selected item to start.
  2. Move selected item 1 page left.
  3. Move selected item to center.
  4. Move selected item 1 page right.
  5. Move selected item to end.
  6. Tap on this number to Exit to normal mode.

Link Faders mode

You entered this mode by following the instruction #14 of the Description section.

link faders numbered
  1. Tap on the Primary Fader ID or Value number.
    The next fader follows the Primary and both sliders change color to distinguish them easily.
  2. Set the Secondary fader to the desired start position.
  3. Move the Primary fader. Notice that the Secondary fader follows the Primary and as long as you keep your finger on the device surface, it remembers the difference between the two of them even if you reach min or max values.
    This means that if you raise your finger, a new start position for the Secondary fader must be defined.
  4. Tap on another fader ID or Value number to set a new pair of linked faders.
  5. Tap on the Link button to Exit to normal mode.

Example

dawvelopment logo